
Connect ExtraFax for Exchange with Microsoft 365 (Applies to: ExtraFax 4.2 for Exchange, ExtraFax 5.0 for Exchange)
Link: http://www.extracomm.com/Extracomm/FAQ.NSF/FAQs/93d79ab56bfe18cb4825882b002105daApply to: ExtraFax for Exchange
Last Modified Date: 08/20/2025
This article applies to: ExtraFax 4.2 for Exchange, ExtraFax 5.0 for Exchange
** Note 1 - If you have an on-premise Active Directory synchronized to Microsoft 365:
- If you have an on-premise Active Directory synchronized to Microsoft 365, instead of following steps in this article, it is recommended to use "Organization" -> "User Synchronization" function to synchronize the required fax users from on-premise Active Directory to ExtraFax (See: ExtraFax for Exchange Administration Guide -> Chapter 3: User Management -> Performing User Synchronization).
- If you do not have an on-premise Active Directory that is synchronized to Microsoft 365, you may:
- Create local users to use ExtraFax ( Starting from ExtraFax for Exchange 2.1, administrator can create local users for users outside of Windows Active Directory).
- OR follow steps in this article to import users from Microsoft 365 to ExtraFax.
|
** Note 2 - For ExtraFax 4.1 for Exchange (or earlier version):
If you are using ExtraFax 4.1 for Exchange (or earlier version) and planning to import users directly from Microsoft 365 with the "Organization" -> "OAuth 2.0 Authorization" function:
- Please upgrade to ExtraFax 4.2 for Exchange / ExtraFax 5.0 for Exchange.
- ExtraFax 4.1 for Exchange uses the old Azure AD Graph api to access Microsoft 365 and that API will be deprecated and retired.
- ExtraFax 4.2 for Exchange is updated to use the new Microsoft Graph API.
|
Connect ExtraFax for Exchange with Microsoft 365
You can setup ExtraFax to connect to Microsoft 365 using OAuth 2.0 protocol. This will be useful if you want to:
- Import Microsoft 365 users to ExtraFax
Import Microsoft 365 users to ExtraFax
You need to do the following:
- Create a "Web application" type application in Azure Active Directory using an administrator account for your Microsoft 365 tenant.
- Create an OAuth 2.0 provider in ExtraFax.
- Create an OAuth 2.0 Authorization User Rule in ExtraFax to import the required users from Microsoft 365.
Implementation Details
The sections below describe the configuration details.
1. Create a Web Application in Azure Active Directory
In this step, you will:
- Create a new app registration in the Azure Active Directory.
- In this app registration:
- Add required redirect URIs.
- Add required API permissions.
- Create a client secret for the app.
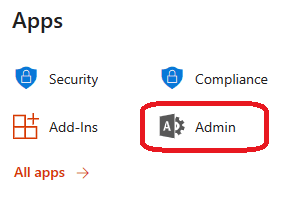
a) Sign in to Microsoft 365 (https://www.office.com) using administrator account for your Microsoft 365 tenant and go to "admin center".
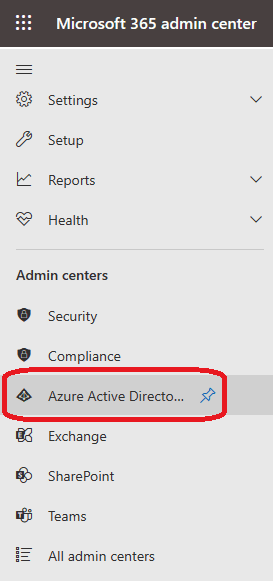
b) Select "Azure Active Directory" on the left side menu.
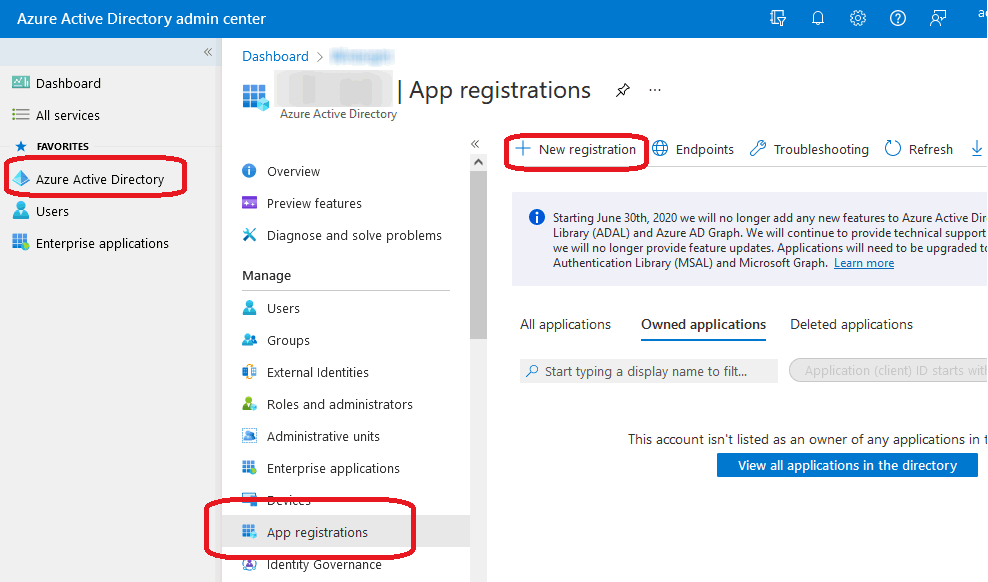
c) Go to "Azure Active Directory" -> "App registrations".
Click "New registration" button.
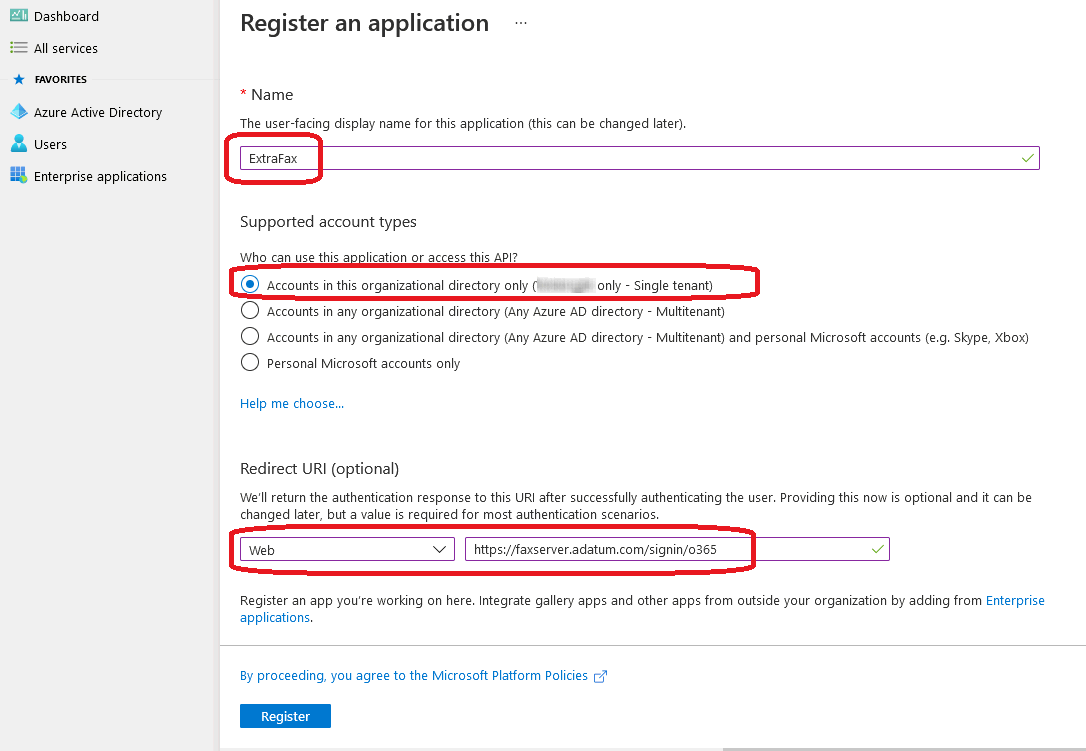
d) In the "Register an application" screen:
- For the "Name" field, specify a name for the application.
- For the "Supported account types" field, select "Accounts in this organizational directory only (Single tenant)".
- For the "Redirect URI" section, select "Web" in the platform drop down list and specify the sign-on URL as follow:
- Click "Register" button to continue.
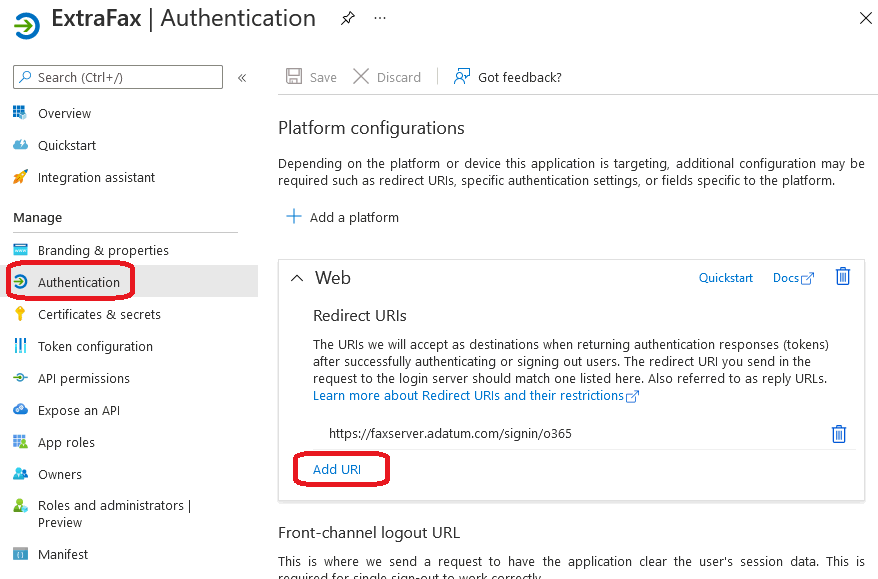
 e) Application was created. Go to "Authentication" and under "Redirect URIs" section, click "Add URI" to add another redirect URL.
 f) Enter a URL as following:
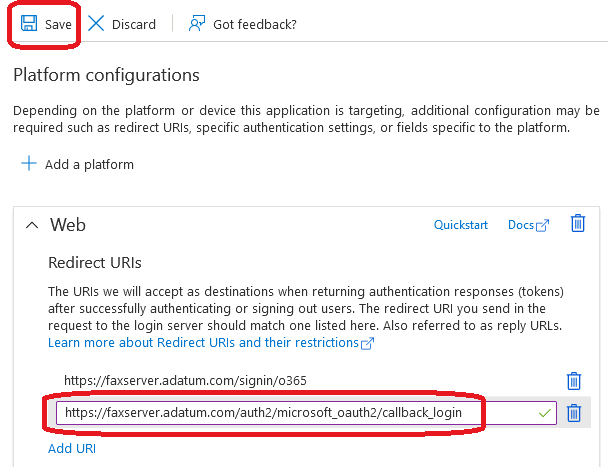
After you added above URL, click "Save".
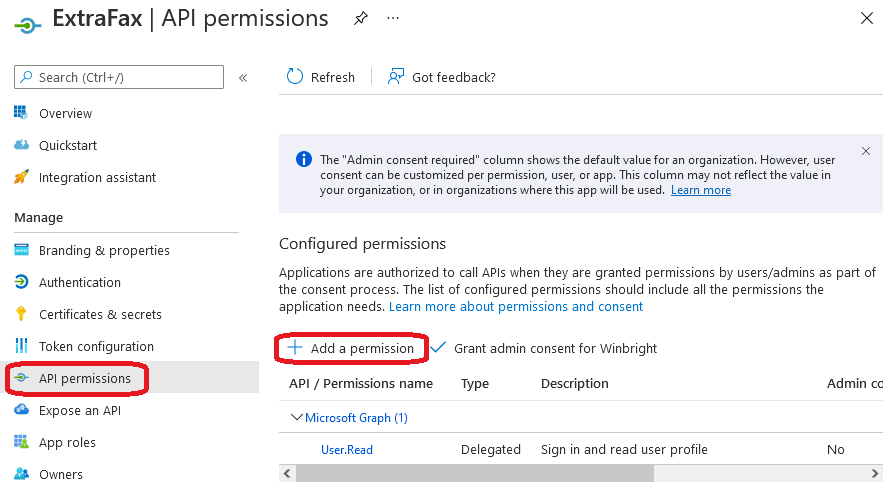
g) Go to "API permissions".
- You can see there is already a permission "User.Read".
- We need this permission. Leave this permission here.
- Click "Add a permission" button to add another permission.
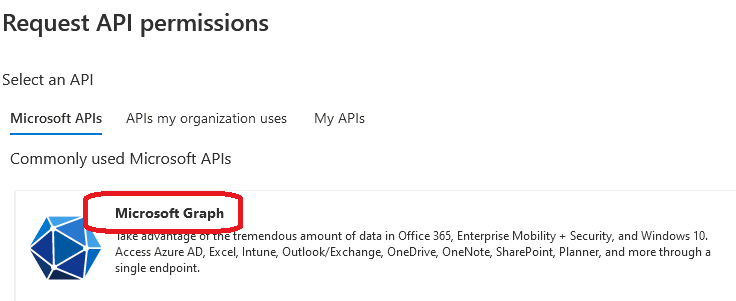
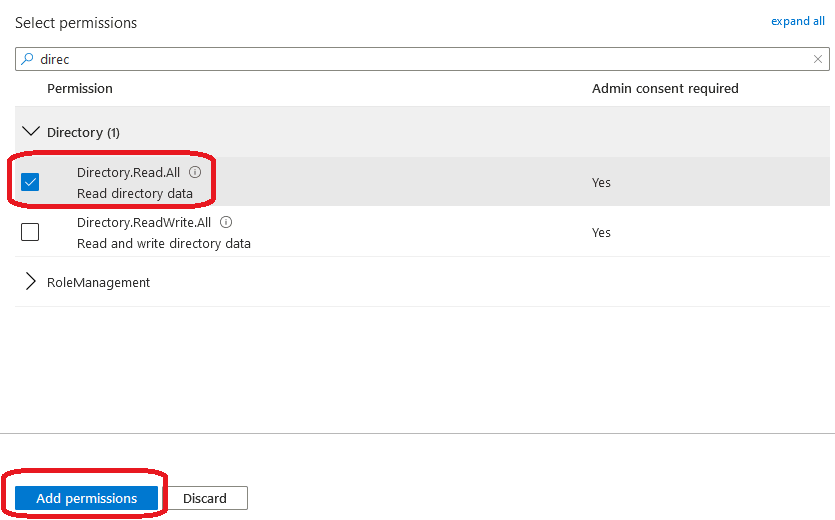
 h) Another permission we need to add is "Directory.Read.All" which belongs to "Microsoft Graph API".
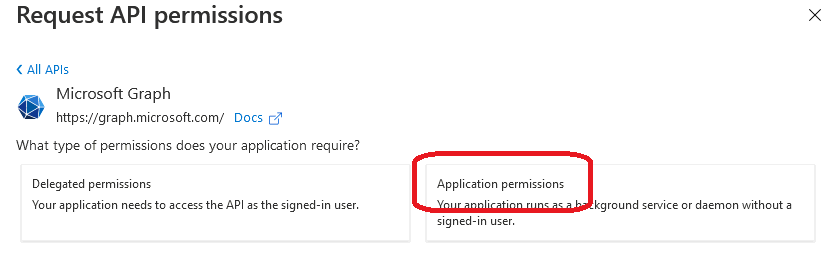
- Select "Microsoft Graph".
- Select "Application permissions" (NOT "Delegated permissions").
- Search and select the permission "Directory.Read.All".
- Click "Add permissions" button to add this permission to the application.
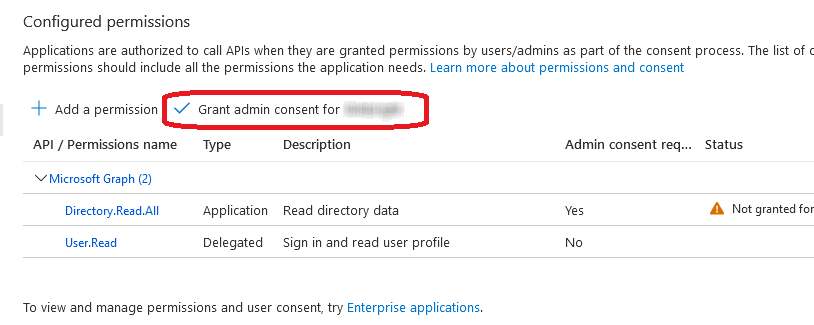
 i) Verify that we have 2 permissions:
- "Directory.Read.All" (Application Type)
- "User.Read" (Delegated Type).
j) Click "Grant admin consent" button to continue.
 k) Click "Yes" for this message box.
 l) You can see the status of permissions are "Granted for xxx" now.
 m) Go to "Certificates & secrets" and click "New client secret".
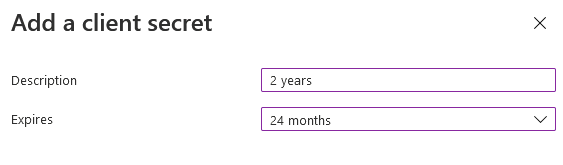
 n) Input a description and expiration period (e.g. 24 months).
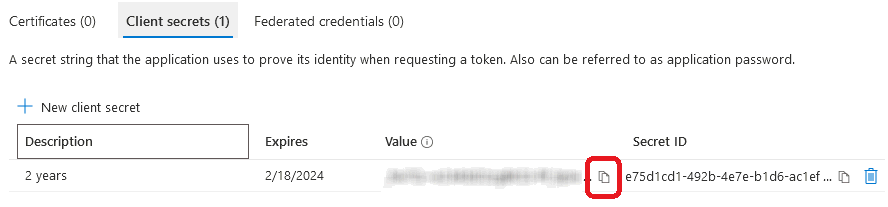
 o) Click "Add". When finished, you will be presented with a new client secret.
p) Copy the client secret to a notepad and save it. Note that you won't be able to retrieve the key value after you leave the page.
o) Click "Add". When finished, you will be presented with a new client secret.
p) Copy the client secret to a notepad and save it. Note that you won't be able to retrieve the key value after you leave the page.
 q) Also copy the "Application (client) ID" and "Directory (tenant) ID" to notepad and save it.
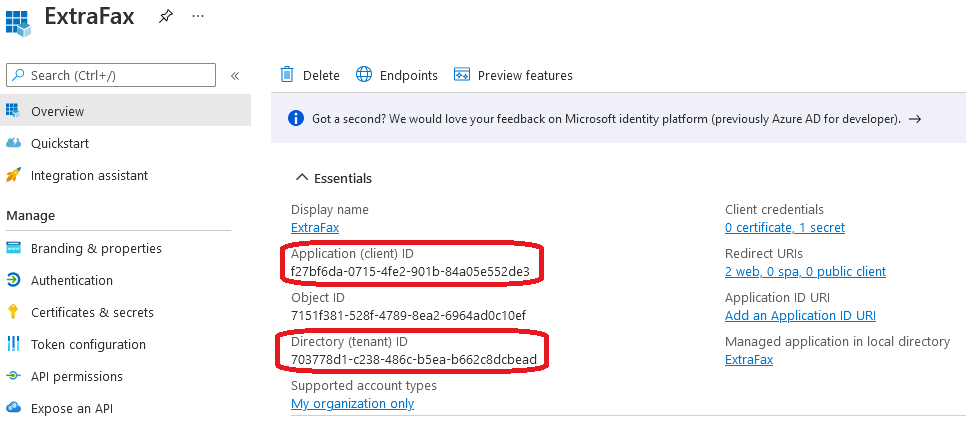 r) Now you have recorded the "Application (client) ID", "Directory (tenant) ID" and client secret in the notepad and these values will be used in the next section.
2. Create an OAuth 2.0 provider in ExtraFax
a) Follow steps here:
- Sign in to ExtraFax as administrator.
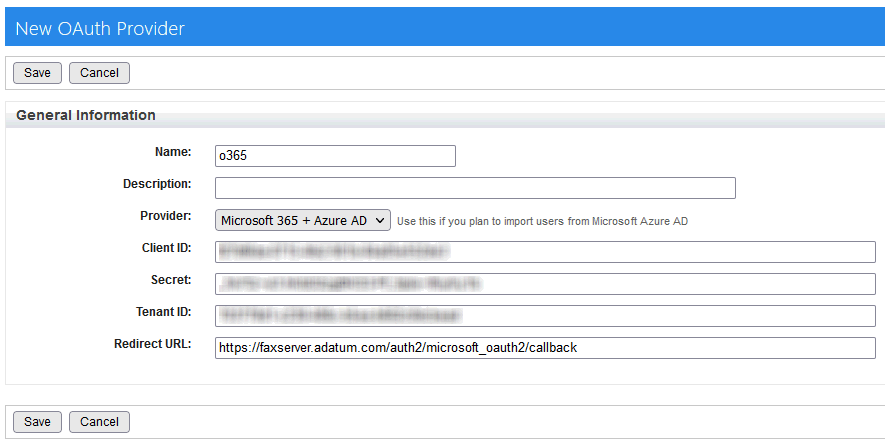
- Go to "System Management" -> "OAuth 2.0 Provider". Click "New" button.
- For the "Name" field, specify <provider-name>. ( Please refer to step 1d in the section above for <provider-name>)
- For the "Provider" field, select "Microsoft 365 + Azure AD".
- For the "Client ID", "Secret", "Tenant ID" fields, fill in the values using the Client ID (that is Application ID), client secret and Tenant ID (that is Directory ID) you obtained (or copied to notepad) in the previous section.
- For the "Redirect URL", use the syntax <http protocol>://<extrafax server dns name>/auth2/microsoft_oauth2/callback for the field Redirect URL.
(Note: NOT <http protocol>://<extrafax server dns name>/auth2/microsoft_oauth2/callback_login)
- Click "Save".
Note:
The client secret you created previously has an expiration date (e.g. 24 months).
Remember to renew the client secret as following when it gets closer to the expiration date:
- Login to Microsoft 365.
- Go to "Microsoft admin center" -> "Azure Active Directory" -> "App registrations".
- Select the app registration (e.g. "ExtraFax") you created in the previous section.
- Go to "Certificates & secrets" and add a new client secret.
- Login to ExtraFax.
- Go to "System Management" -> "OAuth 2.0 Provider".
- Select your OAuth Provider record (e.g. "o365") and click "Edit" button.
- In the "Secret" field, update the record with the new secret.
- Click "Save".
|
3. Create an OAuth 2.0 Authorization Rule in ExtraFax
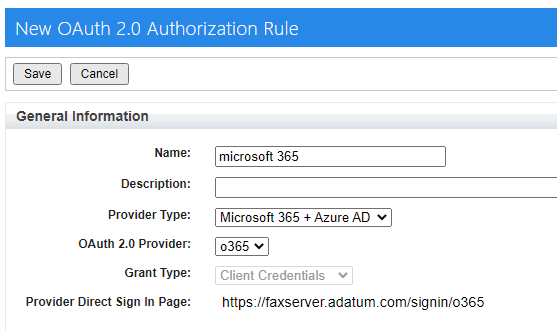
a) Sign in to ExtraFax as administrator.
- Go to "Organization Management" -> "OAuth 2.0 Authorization".
- Click "New" button.
- For the "Name" field, specify a name for the new rule.
- For the "Provider Type" field, select "Microsoft 365 + Azure AD".
- For the "OAuth 2.0 Provider" field, select the provider that you created in step 2.
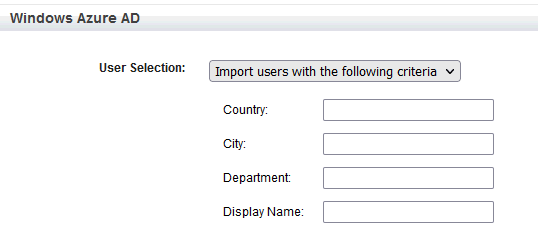
 b) In the "User Selection" selection box:
- If you want to import all users, select "Import all users".

- If you want to import only users from a specific group, select "Import users in the following group" and specify a group name if you want to import only users from a specific group.

- If you want to import users that meet specific criteria, select "Import users with the following criteria" and specify required criteria. This gives you more control on how users are imported.
 c) To import now, select "Yes" in the "Import Now" field.
d) Click "Save" when you are done.
e) The new rule will be created and user import will be started and running. Please manually refresh the page to see the import progress.
c) To import now, select "Yes" in the "Import Now" field.
d) Click "Save" when you are done.
e) The new rule will be created and user import will be started and running. Please manually refresh the page to see the import progress.
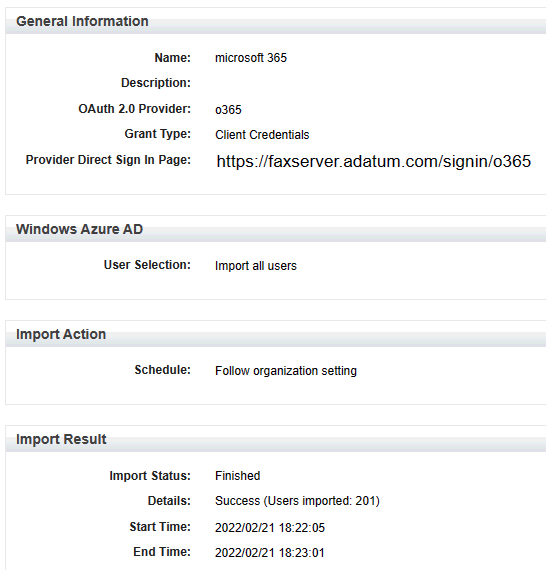 f) When import finished successfully, new users will be imported and can be found in the "Users" left menu.
4. Sign in to ExtraFax using Microsoft 365 login account
To sign in to ExtraFax using Microsoft 365 login account:
a) Open the web browser and go to the sign-on url you have specified in step 1d (For example, https://faxserver.adatum.com/signin/o365).
b) You will be redirected to Microsoft for sign in. Once authenticated, you will be redirected back to ExtraFax WebFax.